
 English
 Deutsch
10. Relations
We will extend the page “Case studies”: It gets the two subpages “Private housing” and “Urban housing”. The projects themselves are maintained in a new area, and each one is linked to one of the two pages.
First, we turn the content area “Pages” into a tree:
To do this, switch to the module “ Structure”.
Click the content area “Pages” > tab “Input fields” > “Create”.
In the section “META FIELDS”, click “Parent record” and save.
Click the tab “Records”. This takes you straight to the record list (module “Contents”).
Create the two pages mentioned above and select the page “Case studies” as the parent record of each.
The records appear indented in the list:
└ Private housing
└ Urban housing
Now we will set up a new content area for the projects:
Switch to the module “ Structure” > “Create”. In the section “RECORD”, this time click “All other content”.
- Name:
projects - Label: Projects
- Instance: Camindo Architects
After you click Save, the new area appears in the list.
This time we will create the input fields ourselves, one by one:
Right-click the area and choose “ Input fields” from the context menu.
The list is still empty. Click the button “ Create” and then, in the section “TEXT”, click “Short text”.
- Name:
title - Label: Title
- Default field: (is preselected for the first field and can stay that way)
After you click Save, the field appears in the area's list of input fields.
Add the following fields in the same way:
- TEXT > “Long text”
- Name:
text - Label: Text
- Name:
- META FIELDS > “Publication date”
- (Name and label are already filled in.)
- FILE > “File upload”
- Name:
image - Label: Image
- Name:
- FILE > “File version (thumbnail)”
- Name:
thumbnail - Label: Thumbnail
- A converter must be selected here: Tick “Internal Image Preview (GD)”.
- Name:
- RELATION > “Relation (bidirectional, n:1)”
- Name:
pages - Linked area: Pages
- Display type: Dropdown (single select)
- Label: Page
- Name:
The list of input fields then looks like this:
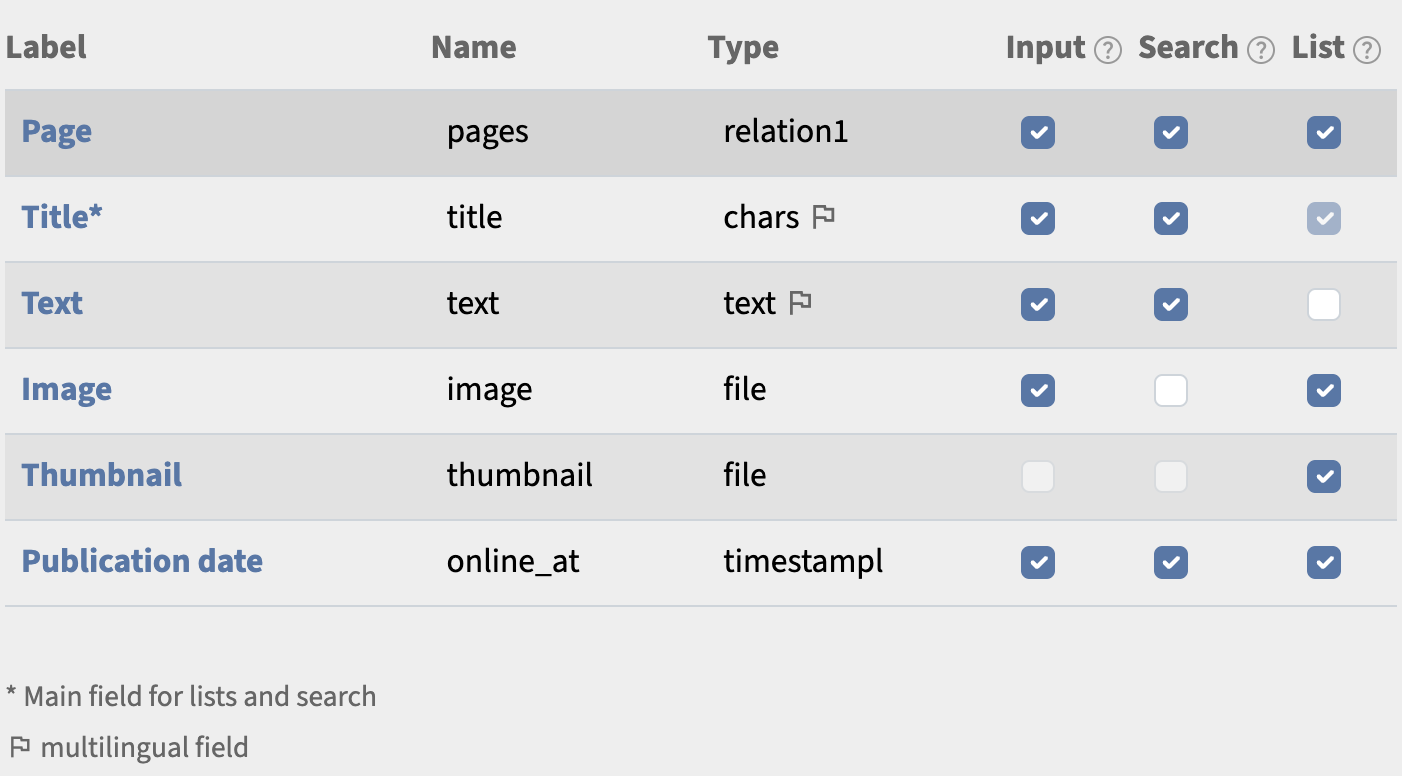
Now we need some projects:
Switch to the tab “Records”. The list is still empty. Create a few records. In the input form, the input field “Page” appears as a dropdown list: Choose “Private housing” for some projects and “Urban housing” for others.
Now let's turn to the templates:
Open the template “page_default” and add the new query to the code (before the closing body tag):
(CMS:SELECT list_subpages
  filter[parent_id]="{$cms['record_id']}"
  sort="position ASC"
)
In a tree, position starts at 0 on each level. That is fine for our subpages. The navigation, however, now fetches records from two levels, so it needs a field that sorts continuously: lft.
Change the navigation as follows:
(CMS:SELECT navigation
  filter[area]=pages
  sort="lft asc"
)
The code then reads:
<html>
<body>
<div>Camindo Architects</div>
<hr>
(CMS:SELECT navigation
  filter[area]=pages
  sort="lft asc"
)
<hr>
<h1>(CMS:TEXT title)</h1>
(CMS:MEDIA image
  attr[style]="width:400px;height:auto;float:left;margin-right:20px;"
)
(CMS:TEXT text)
<br style="clear:both">

(CMS:SELECT list_subpages
  filter[parent_id]="{$cms['record_id']}"
  sort="position ASC"
)
</body>
</html>
The new query looks for records whose parent record is the current record – in other words, the subpages of the current page.
After saving, click the name list_subpages to create a new list template. Its content is:
<br>
<p>Category:</p>
<ul>
(CMS:RESULT_START)
<li><a href="(CMS:URL)">(CMS:TEXT title)</a></li>
(CMS:RESULT_END)
</ul>
Finally, we will create a new template for the subpages. It should list the linked projects:
Name: page_case_studies
Label: Case studies
Code:
<html>
<body>
<div>Camindo Architects</div>
<hr>
(CMS:SELECT navigation
  filter[area]=pages
  sort="lft asc"
)
<hr>
<h1>(CMS:TEXT title)</h1>
<div>(CMS:TEXT text)</div>

(CMS:SELECT list_case_studies
  relation=rel_projects
  sort="online_at DESC"
)
</body>
</html>
This fetches the projects that are linked to the current page. It works through the field rel_projects: camindo CMS automatically created this counterpart field in the area “Pages” when the relation was set up. The projects are sorted by publication date, descending (online_at DESC), and displayed with the template list_case_studies.
After saving, click the template name list_case_studies.
The code for the new list template:
(CMS:RESULT_START)

<hr style="margin:20px 0">
<p>(CMS:TEXT online_at)</p>
<h1>(CMS:TEXT title)</h1>
(CMS:MEDIA image
  attr[style]="width:400px;height:auto;float:left;margin-right:20px;"
)
(CMS:TEXT text)
<br style="clear:both">

(CMS:RESULT_END)
After saving, open the previous template page_case_studies again, because it still has to be made available in the content area “Pages”:
Switch to the tab “Access”. In the list “Add content area”, select the content area “Pages”. Three checkboxes appear. Tick the column “Selectable” and save.
To be able to assign a template per record, we need a new input field in the content area “Pages”:
Module “ Structure” > content area “Pages” > tab “Input fields” > “Create”.
In the section “META FIELDS”, click “Design template” and save.
We will assign the new template to the two subpages in one step:
Switch to the module “Contents” and there to the content area “Pages”.
Above the record list, click the button “ Search”.
In the field “Title”, type *housing and submit the search.
The two subpages of “Case studies” are now listed. To edit both, click the button with the three dots () at the top right above the list and choose “Batch processing”.
The selection “Scope” is already set to “2 records from the last search result”, and the selection “Function” to “ Edit”. Click “Next ”.
The input form of the area appears, with a checkbox in front of each label.
At the very bottom, under “Design template”, select our new template “Case studies”. The checkbox in front of the label is ticked automatically. After saving, return to the list. The last column, “Design template”, now shows the changed selection.
Check in the frontend that everything works as expected:
- The page “Case studies” shows two links below the text (to the two subpages).
- The two subpages each list their projects.
One last cosmetic touch: The subsections in the navigation should appear indented. Adjust the template “navigation” as follows:
<ul>
(CMS:RESULT_START)
<li style="padding-left:(CMS:NUMBER depth mul=20)px;"><a href="(CMS:URL)">(CMS:TEXT title)</a></li>
(CMS:RESULT_END)
</ul>
The field depth contains the hierarchy level stored in the tree, starting at 0. The parameter mul multiplies: At level 1, we therefore get 1 × 20 pixels of indentation.